Thursday, May 31, 2012

Fabric tissue paper cover


I always, I mean ALWAYS have Kleenex with me.  It's in every room in my house, purses and glove compartments...  I was looking for directions for some sort of tissue paper cover, since after awhile they get sort of scrunched up in my purse, and I figured they'd stay better protected and easier to spot if they were in something colorful.

On the Sew, Mama, Sew! blog (which often has some fun reads on it) I found a guest post and tutorial by Jennifer of JCasa *handmade for three different versions of tissue paper holders, PDF found here.

This was easy and fast to put together, less than 10 minutes, using  a scrap of Anna Maria Horner Summer Totem fabric, and a bit of an Ikea sheet for the lining.


I stitched up the sides some to make the opening smaller, because my husband goes on trips to Japan every once in a great while, and brings home these cute  packs of tissue about 80% of the size of the Kleenex pocket packs.  I was almost done with them which I was happy about cause though I love cute animals and dancing teacups, the tissue isn't exactly soft and fluffy.  Sadly, he found a local store that sells some so more ended up in my Christmas stocking.


I mean please, how adorable


Tuesday, May 29, 2012

Intrepid Thread Order and Review

Rhapsodia - FQ Bundle in Sweet Journey
I'd read on Happy Quilting that The Intrepid Thread was having a sale, so unable to resist checking out a new company when there's a sale, I ran to check it out.

Website navigation was easy, and I thought they had some really lovely bundles.  I was really impressed that the same Valori Wells Cocoon FQ bundle that was $22.50 for at another store was under $16 here (I purchased the other bundle for 20% off, it still ended up costing more than Intrepid Thread's regular price).

The only drawback of the ordering process for me was that as far as I can tell, you can't go check on your order status or look up past orders, and no invoice came with the order. I always like being able look up past orders in case I forget the name of a fabric.


utterly inspired pt 2 bundle Maureen
One thing that I found to be both a pro and a con on the website was that the shopping cart opens on the side of the page after you add something to it and it does obscure part of the fabric browsing area.  You can manually close the cart, but if you add another item it reopens.  Only really a problem if you are one of those people who adds everything in the world to a cart before having to make the hard decision of which items you can actually afford to get! Otherwise it's nice to be able to reference what's in your cart as you go.


When I placed my order it was stated quite clearly that orders wouldn't be going out as quickly as usual because they were having big sale, so always bonus points when a company communicates to the public if there's going to be potential issues.


Lovingly packaged
I got a follow up email that one fabric in a bundle was out of stock and did I want to remove that bundle from my order (as if) or wait for it to come in, in which case it wouldn't be shipping until after quilt market.   I really appreciated the prompt update and good customer service.  My order was shipped right when she got back and she was sweet enough to include a couple of Valori Wells charm squares.


Woodland Tails bundle in blue

I got this woodlands tails bundle in order to make a baby quilt for my best friend.  He and his fiance aren't getting married until next June and I'm getting the impression they are going to wait at least a year to get started on kids, so this is jumping the gun a wee bit... but its so damn cute I couldn't resist, especially those sheep.

I'd rate my experience top notch, & I'll be ordering again.


Saturday, May 26, 2012

Handstitched - Stitched In Color class


I'm super excited to take my first sewing class.  It might say something about my introverted personality that it's an online class (or it might just confirm I'm devoted to wearing pajamas and I can't do that in public),  but as what piqued my interest in quilting was a quilt on Rachel's Stitched in Color blog, it seems only fitting that I'd take her class to learn the intricacies of hand stitching.

I'm quite a procrastinator, so I was lucky I signed up the same day she announced it was open, as it sold out rather quickly.   I bought the student kit for it, and chose a lovely moss colored felt that reflects the soggy pacific northwest parks full of greenery and banana slugs.  It also had several different sewing related items such as transfer paper I haven't ever used.

I'm really looking forward to the class start on June 4th, and think I'm mostly prepared supply wise except some freezer paper - and I'm sure I'll need a bit more fabric, everybody always needs more fabric!

It should be fun seeing if I can keep on a schedule which is as follows:

Week 1:  Reverse Applique - no experience 
Week 3:  Embroidery - limited needlework as a pre-teen 
Week 5:  English Paper Piecing - no experience, looking forward to learning 
Week 7:  Applique - I've done one item with the machine and one by hand, both teeny. 
Week 9:  Hand quilting - a bit of decorative experience on a couple projects after reading about it @ Stitched in Color and a great tutorial on Anna Maria Horner's blog. No idea what it will be like to do actual practical quilting, but since I can't fit a larger quilt into my sewing machine this will be the most useful thing I learn I imagine.

I'm a bit conflicted and worried about the medallion quilt for the main project.  I like aspects of it but there are so many pieces and shapes I'm worried about making a cohesive color scheme arrangement  that works for me. Have some plans churning for it at least!

Thursday, May 24, 2012

Jelly Roll Floor Pillow


Gorgeous version from living with punks
I saw an amazing floor pillow made out of a jelly roll at the living with punks blog and wanted to make my own.  She had lots of great pictures, and had gotten the directions from a tutorial/recipe at Moda Bake Shop


I really dig Moda Bake Shop, I mentioned that before but I cant say enough how I love that people contribute tutorials and patterns.


I'd ordered a Kaffe Fasset jelly roll from Fatquartershop.com and well...it was ugly.  Let me amend that - most of the fabrics were really not to my liking.   It was a neutrals roll on sale for under $20.  It had a different color of the print I made my much beloved bathrobe from, and for that matter a different color of the fabric I made one of my favorite shirts out of, but it just made me realize I need to stick to buying the bright cheery colors I like.

Solution: Cat bed
Reason: Cats don't care about color coordination


Truth...I read the beginning of the directions but not all the way through. Really I just read steps 3-5 and then cut all my strips instead of doing what they suggested...sew then cut, sew then cut...therefore it could've gone together better. READ DIRECTIONS!  I really have to get better at this or I don't get to tell my husband to read directions when he cant figure out how something works, and I LOVE being able to tell him to read directions!
back
So since I realized I hadn't been reading the directions, I decided to be stubborn and not read any of the rest of them.  I have no idea if I put together  any of the rest like they suggest either - I cut out 4 quarter circles from some fuzzy fabric I had and sewed them together for the bottom of the pillow, stuffed it with batting, and it seemed to all go together pretty well.  I was pleased that it took less than an hour for one cat to find it, and 12 hours later there were two on it.  I'd be pressing my luck though, if I hoped for my third cat to join in on the fun.


Wednesday, May 23, 2012

Stamped fabric labels


sew-ichigo.blogspot.com Kitchen Classics Series
I'd only heard of paper piecing a month ago, and saw some great projects that used letter stamps.  Then I saw a post over at Sew Quine about making labels with stamps, and soon it seemed like I was running into interesting uses for stamping fabric all over the place, including some awesome quilt labels at one of the blogs I read (sadly for the life of me I can't find the link, as I think she'd gotten the same stamps I did, and her quilt labels were adorable).

ayumills.blogspot.com Juice Blocks

So I stopped by Joann's and lo and behold, they were having a 40% off sale on stamps and stamp pads.  I hadn't read upon what type of stamp pad to get and panicked.  After about 10 minutes of reading every single stamp pad and seeing nothing about fabric except one that said "not recommended for fabric", I just gave up and grabbed an inexpensive one from Hampton Art.  With the sale and my 10% off card I ended up with the alphabet stamps, a stamp pad, and some Sewing related stamps from TPC Studios for around $13. 

Did a bit of looking around and found this awesome link at Crafttestdummies.com where somebody was gracious enough to compare the clarity and washability of 12 different stamp pads on fabric

Monday, May 21, 2012

Patchwork Prism QAL Progress: Quilt Back


I've managed to finish the quilt top, and it's basted to the batting waiting for me to get the back done.  I wanted to take the easy way out and do a solid back, but since I am ahead of schedule, it seems wrong to not try to make something a bit more creative.  I know I could go MUCH more creative but I'm taking baby steps!
I decided I would do a white and grey Kona Cotton (I think the grey is slate), with a few hexagons in it.  As I couldn't put down any of the hexagons down to test the placement for more than 60 seconds without a cat laying claim to it, I'm sure I could've come up with better choices but I gave up ;) I'm looking into making a design wall at some point in time to help me out with the kitty issues!
Now I'm just waiting for some more Kona Snow cotton from Fabric.com to get here so I can finish the back and put it all together.


Saturday, May 19, 2012

Ali makes wine: Banana Pineapple Viognier

Wine kit
Grape Juice
So it's not wine time exactly, it's more of a "wine light" time.  It seems that there's a chance we will be relocating to another state soon, and I'm not sure I'll have time to wait out a nice long aging process. I haven't made a batch of wine for 9 months and I don't want to put it off until I know whether we are moving (have to stay ahead of these things!) so I ordered a wine kit.  I decided on something I'd had my eye on for over a year, Orchard Breezin's Banana Pineapple Viognier. 


K-pak, yeast and additives
Yes that is a cheezy name!  There are three "wine light"lines that I'm aware of - "Orchard Breezin" by RJ Spagnols "Summer Breeze" by Mosti Mondiale (which I haven't tried) and Cellar Crafts' "Island Mist".  I guess they need to have cheezy names so you're not surprised when you churn out more of a cooler instead of a wine. These kits are nice because they are inexpensive ($72 for the kit with shipping - yields up to 30 bottles) and are "drinkable" in four weeks.  


Checking the specific gravity
A lot of people change these kits into full alcohol wines by adding more sugar during the beginning steps.  You can get extra fancy and make or buy inverted sugar, but for the couple of "wine light" kits I've made before I just made sugar syrup for.  Wine making CAN get all mathmaticky and thinky, but I try to avoid that whenever possible and have managed to enjoy the process without worrying overmuch about the chemistry that can be involved. 


Juice all ready, yeast cast
I made two alterations to the kit's directions.
1. I boiled 1.5 cups of sugar in water, let it cool and added into the 6 gallon bucket
2. I put 2/3 of the included K-pak (basically sugar syrup with flavor, in this case banana and pineapple) into the juice mix.  This increases the alcohol level, and decreases the end sweetness (these kits can be overly sweet).  Orchard Breezin' normally ends with about 6.7% alcohol.  My specific gravity was reading about 1.074 which will end up being about a 10% alcohol.  Under the 12-14.5% of most commercial wines, but that's good, it means I'll be less likely to overindulge.


Airlocked and ready to go
Each wine kit has directions that are easy to follow about each step up to the bottling stage.  Beginning a wine is simple, you basically put your grape juice in a sanitized bucket and add water to 6 gallons (higher quality kits have more juice, some are a full 6 gallons of juice).  When the temperature of the juice is between 70-80F you sprinkle the yeast on it, cover it with the sanitized lid, put an airlock in it so CO2 escapes but nothing gets in, and then leave it alone. Now I just follow the schedule, and in two weeks and check the specific gravity again to see if the yeast is done working and it's time to go to the next step.


Thursday, May 17, 2012

Ali makes dinner - Chicken with Prosciutto & Sage

I'd run across this recipe for Smashed Chicken with Prosciutto and Sage last month at Gastronomical Sovereignty (no idea what led me there but mmmm), and have been waiting eagerly to try it.
It's a pretty straightforward recipe, the only thing I wasn't expecting was to wrap the prosciutto around the chicken BEFORE pounding the breasts flat. I ended up using chicken stock instead of white wine and mounted it with some herb butter at the end to thicken it up a bit. I usually get impatient when I make a sauce reduction like this and don't wait for the liquid to boil off enough so end up with a watery, if tasty, sauce.  My patience paid off and it was nicely thickened and so delicious!

I rolled out some pasta to go with it, but alas I didn't have any vegetables around to stick on the plate.  I can't wait for my zucchini to start spitting out fruit left and right so I don't have an excuse to not have some vegetable like product with every meal!

This recipe had less than 5 minutes of prep and only took about 10 minutes to make.  I'm a fan of quick and easy recipes - especially when there aren't a ton of steps or ingredients, and I'll be making this again.

Wednesday, May 16, 2012

Fatquartershop.com Order & Review

packaged FQ bundle of Moth Cocoon (Valori Wells)
I made an order from Fatquartershop.com to finish a few gaps in my patchwork prism quilt.  My review for this order is just about all positive.  Despite the cart telling me they were backed up on orders and running 24-48 hours behind, they shipped my order out the same day, even though I'd made the order after their 3pm eastern time deadline for same day shipping.  For my order size it was either $10 for ground shipping or $11 for priority, so I went with priority and had the fabric in my grubby little hands 48 hours after I ordered it - Texas to Washington.  Not bad!

unfolded lemon grove fat quarter
I was thrilled how they packaged their fat quarter bundles in contrast to the ones I'd gotten from Fabricworm.com.  I pulled them from their packaging and neither of the bundles were creased.  If I was wasn't from the school of pre-washing, I'd never order from a company that packaged bundles any other way, as ironing would be a cinch. The bundle to the left was on sale and is out of stock now, which means it'd been sitting around for awhile, but due to how it was folded, it didn't suffer for it.

hand washing my pezzy print charm pack

I got a bit more fabric, including a charm pack of Pezzy Prints which I'm going to base a quilt around and a Kaffe Fasset jelly roll.  The down side was that my order was over $60, at that price shipping jumps from $5 to $10.  As there wasn't a lot of weight or bulk to my purchase it hurt a bit to pay that much.

Summary: I wish the FQS carried a few more of my favorite designers so I could use them as my one stop shopping store, but I'll definitely be ordering from them again.  I do find it unlikely I'll ever be close to the $200 required to get free shipping unless I get the patience to not shop impulsively (cough GL with that) - or keep my eagle eye peeled for free shipping promotions.  I will add that I found Valori Wells FQ cocoon bundles at a less expensive price elsewhere - s $15.31 vs $22.50 so although I felt their prices were good overall, I'll certainly be more aware about comparing prices between vendors in the future and factor shipping rates into it.

Monday, May 14, 2012

Weekend Progress: New Look 6648, Colette Meringue Skirt

I've been so focused on quilting that I haven't made anything to wear for a few months now.  I figured I should take a break and see if I could churn anything out. Sadly I only finished one item but I at least attempted two.

New Look 6648  - I've finally learned to use inexpensive knits first to try any new knit shirt pattern.  Though even at my smallest I never felt I had narrow shoulders, the area between my neck and shoulder is a few inches narrower per side than average, so sleeve seams are often sliding way off my shoulders.  I make alterations to all the patterns I make, but it still isn't usually enough.  Therefore I'm making an effort to make more shirts without set in sleeves so I don't have to tinker with altering multiple pattern pieces.

This is not the best pattern for my shoulders as it already has a very wide neckline.  I did narrow the neck by an inch on each side, and my muslin fits pretty well. I'm sure a camisole will look fine with it to cover up those pesky bra straps.  I have a short torso so the waist is ending up at hip level, which of course makes it a bit of an odd (read: snug) fit there.

The pattern was quick and easy, though the side gathering seemed like it wasn't working and looks wrong until it's on the body.  I'm looking forward to making another one with a few tweaks for fit at the hips and the neckline.

I'll add a review to Patternreview.com which I want to say, if you sew, and haven't seen this website, you should really check it out.  It's got people (like me and you!) who sew reviewing not only the big 4 patterns, but a lot of smaller & boutique pattern companies.  It's been an invaluable source, for tips and advice on how to deal with certain patterns.

They do happen to have user reviews of the Colette Meringue skirt too. I asked for a copy of The Colette Sewing Handbook for Christmas but didn't do the sew-a-long for it that started in January.  I've decided I want to do all five patterns that are in it, though truth to be told, I don't really think any of them would be flattering for my body type or my style at all.  For those of you who haven't heard of them, one thing that stands out about them is that their patterns are cut for C cups instead of B cups like the big 4 pattern company are.

Saturday, May 12, 2012

Finished Project: Coin purses

Finished coin/etc. pouches
Tomodachi fat quarters from Etsy.com


Kawaii from Hawaii in Fun Day Beige
I'd been meaning to buy some Kawaii tomadachi fabric (I don't know if there's more accurate terminology) on Etsy for almost a year now, but never got around to it.  When I was ordering from Fabricworm.com, last month they had some Kawaii fabric.  Now I'm not fond of the banana yellow background color at all, but I figured I may as well add it to the order while I was shopping you know?
.

Lining side up


I'd wanted to make a purse or pouch of some sort for my sister, and decided I'd work with this first, and then order some other prints at a later date if it worked out'd seen a tutorial for a cloth coin purse at Me? A Mom? which references an oil cloth coin purse tutorial at Fresh Picked.  I needed to reference both for all the steps to make a padded cloth version.
First I made some slightly larger ones than were in the tutorial, starting with 7 x 8.5 inch fabric, ending with finished  purse sizes of  4.25 by 6.5 inches.  For the smaller pouches I followed the 5 x 7.5 inch measurement in the tutorials

Things I could've done better - sewn another row of stitches through the edges of the zippers during the first few steps so it was more secure & finished looking inside.

Serging the edges instead of pinking them would look nicer (I didn't use pinking shears originally but a couple of the linings were threatening to misbehave so I ended up pinking them when I was done).  The peacock pouch where I put the zipper at the very top was made with a pretty wide zipper, and that didn't work out as well as using a more narrow one would have, though I think a thick zipper would be just fine for other placements. 

Hand topstitch
 When I used a 7 inch zipper for a smaller pouch I found it impossible to topstitch by machine, so I just grabbed some embroidery floss and did it by hand.

Overall a fun and relatively quick project.  I really like how you can put the zipper anywhere you choose. I have another tutorial for these that is slightly different so I think I'll try that soon too.


Thursday, May 10, 2012

Coaster of the month: May

Poor slightly deformed coaster front

beloved monkey coaster
Coaster a month...why not?   I like to drink things, and summer is coming up which means iced beverages galore.  We use glass topped coasters in the computer room, and I can't say how terrifying it is when the condensation makes the coaster stick to the glass for a few seconds before it disconnects itself and crashes to the desk.  It almost always happens on hot days (or with margaritas!)  so two years ago I started putting iced things on a napkin instead.  However my husband can't seem to resist the lure of his Monkey coaster (I like to think it's because we picked out our coasters several years ago on a pretty fantastic vacation, so it's deeply sentimental to him!) and so this is still happening with regularity.  It seems like a fabric coaster is in order to calm my nerves.

Jelly roll strips
Used leftover strips from my kitchen mat to make triangles for the front.  For the back I used the the scraps left over to make an abstract mishmash.  I sewed the batting to the first side before sewing the right sides of the fabric together, turning it right inside out & hand stitching the opening closed. In retrospect I should've sewn the batting to the back side instead since it was the one with the abstract pattern - it did need to be sewn through with a zigzag stitch on the back, as the scraps were so small I didn't have a seam allowance available to secure them all together. Lesson #42 learned - think things through! (should've been lesson #1 probably ;)

coaster back
 I am sure my projects can and will improve over the next year. I mean, it can't get too much worse!  I'll use seam binding in the future to provide a nice square look to the corners when my bamboo skewer doesn't seem to be vicious enough to stab them into pointy-ness.


Pondering trying a porthole for next month's coaster, I've been really starstruck with some of the porthole quilts I've been seeing.


Tuesday, May 8, 2012

Patchwork Prism QAL Progress & Preview

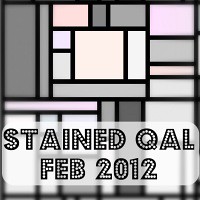
I have finished my top!  I had more problems than I could count, and if I had it to do again I'd do so many things differently.  Time after time triangles got turned around and scattered (often by rampaging kitties).  I didn't take enough care in assembly and with having to move pieces to a different room to sew them I did indeed lose track of which way was up and which was down, therefore some of the prints with pictures face totally different directions (Why YES indeed, that did cause some problems and required rearranging my design). 
the ugliest little hexagon of all
I'd gotten a Free Spirit half yard bundle at Fabric.com which I posted about earlier.  There were a lot of shall I say "less than awesome" fabrics in it, but I figured if I didn't use them in this, where the heck would I?   Of course that was before I realized I was going to fall in love with my Patchwork Prism...the truth is I didn't think this particular quilt pattern called my name, I just got excited because it was the first QAL I wandered across since I started quilting, and I'd seen a few past QAL's that I wish I'd been around for at the start, and still hope to make. (Hi you sexy little Bottled Rainbows.  I don't mean to be too vulgar but - I'd like to get you into bed with a Stained QAL quilt and snuggle both of you all night long.)


 Of course the other reason I decided to use those fabrics was $$$.  I was at the limit of my fabric budget, and as such a new quilter I didn't have a lot sitting around the house to choose from.  I was stubborn and didn't want to use too many repeats of the same fabrics so I wanted to throw at least one of everything I owned into the mix.

So I have some of the bundle strewn throughout the quilt, but that picture there at the top is the hexagon area that is the most cringe-worthy, a gorgeous Valori Wells fabric surrounded by random bundle fabric.  The truth is though, that every time I see that part of my quilt I will have fond memories about my first Quilt-a-long, and the lessons I learned from it.

white focal hexagon
dark focal hexagon

 There are parts of my quilt I love though.  I know it could've had better movement from light to dark, more attractive fabrics, lovely dainty prints incorporated into it, or a cohesive color scheme.  Nevertheless,  I have it laying out on the living room's hardwood floor so I can look at it when I walk through the house.  Usually I walk in and find it crumpled into a pile of sorts, showing that the cats were having their fun.  In those times I see this gorgeous mess of blues, greens and yellows, and I get excited for when it's ready to all go together.

I've seen some beautiful progress on other people's quilts, but I've decided there's no reason being envious of their skill and color sense when I have my own je ne sais quoi!
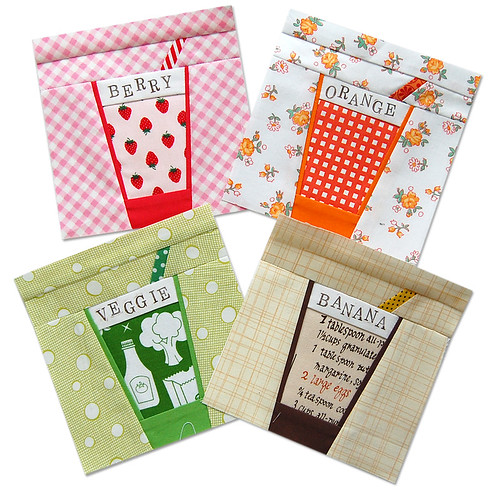
Sunday, May 6, 2012

Bath Bomb Recipe #3 - Rosemary Peppermint


Since neither of the previous bath fizzie recipes I tried were particularly amazing, I decided to wing it, as I figured my own combo couldn't be worse than any other mix out there (not that it'd be better, just not worse...).  I was going to just go with baking soda and citric acid, but with yardwork and quilting I figured I could use some Epsom salts.

1.5 cup             baking soda, sifted
0.5 cup             citric acid, sifted
0.5 cup             Epsom salts
1.5 tbls             almond oil
spray bottle with green food colored water in it, used about 1 tablespoon.
¼ tsp each rosemary and peppermint essential oils
As before followed the wonderful picture tutorial at instructables.com

I made the mixture pretty damp this time before putting it in the silicone ice cube tray, damper than either recipe 1 or 2. I let it dry for 48 hours just to make sure it was dehydrated enough to not crumble apart when I removed it from the mold.

With a bit of forethought I could’ve gathered some mint and rosemary from my garden and dried it to throw in, but forethought isn’t really in my vocabulary. As it was, I got the whim to go make these and about 15 minutes later they were in the mold,  and I went back to my regular schedule of doing things not related to bath bombs.