Showing posts with label handstitched class. Show all posts

Monday, December 31, 2012

Finally Finished Modern Medallion Quilt!!!


I thought this would be a great year ending post (a super long one too).  Earlier this month I finally finished the quilt for Handstitched class at Stitched in Color that ended in August.  Since then I'd been working on hand stitching the border in bits and pieces. I am thoroughly satisfied with being finished. AND I'm just in time as registration for Rachel's classes start January 1st, and I'm going to register for the Curves class.

Some of the techniques that went into this quilt and how I felt about them-

Reverse Applique: Simple enough, though I did NOT read the directions so I made three times as much work for myself as needed.  I will probably be using this technique in the future but haven't had a reason to do so yet..

Perhaps because THIS fabric is cotton sheeting instead of quilting cotton, it's the one area of the quilt that got ripply.


Satin & Jewels:  Phew was it time consuming!

I opted to add in a bit of embroidery from September House, and also a picture of some henna work I saw online.  My border was half an inch too small so I altered from the original design quite a bit, but looking back I wish I'd just narrowed everything a bit and stayed true to the original.

The colors and shape has held up pretty well after the first washing, this was also the motivation for me to start embroidering in general.


Applique: It was fun to try, but I find it unlikely that I'll be incorporating it into anything except wall art.

It doesn't seem sturdy enough to me for anything that is going to get much use, and with three cats well, you do a lot of laundry.


English Paper Piecing: This was fun, it's wonderful because once you learn it you realize you can make all sorts of designs on your own (or follow any of the thousands of ideas already out there.)

I've done several paper pieced projects since I did this part of the quilt. Also become addicted to paper piecing hexagons.

Also I'm now going to do the BOM paper piecing QAL over at Quiet Play that starts next month.


On Point Squares: Fun, and I had enough of a seam allowance on this part (wasn't the case with a few parts of this quilt, let me tell you!) to sew it together correctly. No clue if I'll use it again but I'm glad I wont be scared to try it in the future.


Hand quilting:  There are som good tips & tutorials on it from Anna Maria Horner and, surprise surprise, Rachel at Stitched in Color

I don't love doing it, it's hard on my neck and wrists and pretty timje consuming - but unless I get a more quilting friendly machine, I think I will be doing my share of it.

Have been using on a few other quilts so far and a lot of smaller projects.  I think the key is moderation.  I also did a gingko leaf pattern along two of the sides, I think I'd like it with all orange peel too, but I wanted to try something else.


I hand washed the quilt in the tub with Eucalan, and after that and a stint in the dryer it was cat hair free.

I mean I'm afraid to use it now as it was so much work and I'm pretty sure I failed to use a 1/4" seam allowance everywhere so it will come apart if I look at it sideways, but I do plan on taking it out and looking at it now and again ;)
 
The back was a lot of the leftover fabrics from the quilt,  I'm not sure piecing backs like this is really my style but it was nice to try it out. The middle certainly puckered up differently than the rest of the more heavily quilted areas after washing.


So I love love love it, flaws and all.  By far the most satisfying thing I have made to date.


Monday, December 10, 2012

Star Blossom Paper Piecing


Hallway's too narrow to get a straight on shot of course


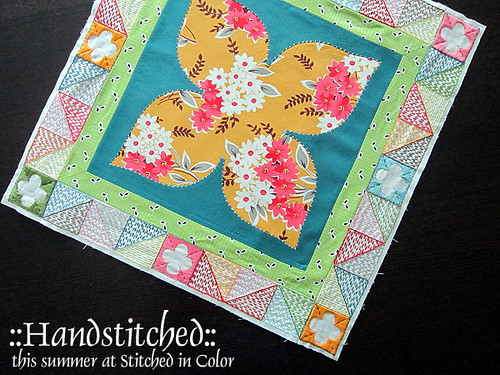
This Star Blossom block is a project from the Handstitched Class that Rachel @ Stitched in Color teaches.  (Shes opening registration for her classes again January 1st, I highly recommend you try her Handstitched class if you have any interest, I'll be taking her Curves one if I can)

This is paper pieced, sewn onto fabric and mounted on a 16"x20" canvas ( to do with as your imagination dictates).  I certainly did a better job on it than I did my first two attempts at paper piecing!


This is the second item I've sewn onto fabric & mounted on a canvas, and this one doesn't lay perfectly flush against the background fabric, but I am still pretty happy with it and I'll like it more when I get around to painting my walls beige ;)  Not sure about my fabric choices, I still have a lot to learn about that subject.

The piece in the middle was supposed to be more off center to show the other elements on it a bit more, but instead it just looks like I was trying to center the flower and sucked at it :)


unmounted and finished
Speaking of fabric, , I realized my carpentry skills aren't good enough to tackle my own cubby storage right now like I planned, so I got two ClosetMaid storage units from Lowe's.

 My stash was getting a bit unwieldy as I was keeping it in a stack of plastic bins, which of course always had at least one cat sleeping on the top lid so I couldn't get to it.  These aren't the best storage solution (had to turn them on their sides for the fabric to fit in this way) but they'll work for the time being and were not that expensive all things considered ($45 each).


One unit is being used for prewashed  fabric (I stopped prewashing 6 months ago) and I'm thinking I better really delve into the prewashed to make some room since I couldn't fit all my non washed fabric in... I'm hoping that having it all visible will uh...keep me from buying more?

Friday, August 3, 2012

I'm done! I'm done! I'm done!


Thank goodness for cat kennels!
Ok, I'm not done but I'm caught up!  I stayed up until 1:30 am Friday morning finishing the embroidery, making the backing, and sandwiching my Modern Medallion quilt for Handstitched class.   My husband wasn't home to hold it up for me so I just took a few quick horrible pictures before taking it back in to start marking for hand quilting.

  
I wet blocked the top (that was fun to try), and got a lot of the waviness out of the center medallion & paper pieced blocks.  I may do it again, as there is some rippling at the outer edges and the center has stretched again during sandwiching.

I had my share of problems with this quilt.  99% of them were because I didn't follow  written instructions, or watch a video all the way through to see what I was supposed to do.  That didn't stop me from failing to follow directions over and over again though!


Things I did "different"
- Square quilts are not my "thing"  so I added a couple of strips of fabric to elongate it into a rectangle.
- Altered the embroidery towards the center - some of its a hit, some a miss.  I was all over the map with Indian additions & lopsidedness.
 - Adding a ginkgo leaf stencil to two borders for the hand quilting. (I'm pretending ginkgo trees are from Morocco instead of China).


Quilt Back
Quilt back: I didn't really want to piece together fabric for a backing, but I hadn't planned ahead and then it was time to put it all together!  I used some leftover solids and a print, excess 2.5" strips from the border, some of the sheeting I used for the center medallion, and two 1/2 yards cuts of Illuminate in Orange from the 1001 Peeps collection by Lizzy House (I accidentally ordered half a yard from two different shops in the same week...hadn't planned on using it for this) I'm pretending the little candle holders are  genie lamps!


Peeps Illuminate in Orange

Tzatziki making herself at home

Friday, July 13, 2012

Handstiched Class - Paper Piecing Progress

PHEW So this is an intensive part of the Stitched In Color Handstitched class. I am still working on the embroidery from the last class, and working hard on the paper piecing from the current one.  I didn't expect my fingers to be as full of holes! I'm starting to think this is more dangerous than working in a kitchen ever was ;) This quilt is going to be hundreds of hours of work by the time I'm done, but the good thing is that people can choose to leave out some of the details and things that make it so time consuming if they chose.


All basted and ready to join the party
I was nervous about trying paper piecing, it took a bit to get the hang of it, and I kinda failed to watch the video tutorials all the way through, which might explain that.  Turns out it's kind of fun, and even soothing, however it's pretty tiring on my fingers

I stayed up until 3 am Wednesday night basting all the pieces I hadn't done yet.  Now I'm doing shorter stretches, and I want to take a short break to work on another project, rest my brain and my teeny little finger muscles.


Clipped so I can whipstich them together
After seeing hair clips being used to hold binding onto things, I thought I should try them out for this paper piecing, as holding the pieces together can be a bit difficult and slippery.  My triceps are sore from all the sewing and holding too!  Once I started using the clips I've been finding it easier and quicker to sew.

As you can see at the top, I finished one of my Storm At Sea Blocks - I needed some incentive to get rolling on the rest of it.  If I'd been using a clip then, maybe my hexagon wouldn't be askew!


My husband is out of town until Monday, so I am hoping to catch up on all my class work.  I'm also keeping busy in the kitchen, ordinarily I'd be hoping to make more use of fish and veggies, but instead I managed to put together homemade potstickers. He'll be really envious he's not here, but I'll freeze some for him, cause I'm sweet like that! 

Wednesday, July 4, 2012

Handstitched Class - Progress on the Modern Medallion


Ahhh, it's exciting yet terrifying when you deviate from a pattern.  You might end up with an amazing unique end product, or you might end up spending an hour tearing out stitches.  I'm not quite sure where I am with this one - my plan was to incorporate some additional embroidery designs into it, that led to the "Moroccanish" feeling I'm aiming for with this quilt. Thinking though that it would've been accomplished anyway the way it was designed.


The pearl cotton to the left I got from purlsoho.com (except the bottom left green which came with my student kit).  Although it didn't strike me so at the time, the dark orange and lighter yellow seem nearly glow in the dark, especially when I'm working on the quilt at night.  It's a wee bit scary!


extra detail
The black floss I'm using for for some of the embroidery really stands out too darkly - maroon or brown might work better.  I may redo it if I find it's bothering me, but I'll wait and see how it looks with the other elements down the road.

I got the Indian Spice Hand Embroidery Pattern from September House.  I am hoping I might have the chance to use more of it in different areas of the quilt, but I'll have to wait to see what Rachel has for us next week.


My strip for embroidery ended up about 3/8" short, so I partitioned  it differently than the plan. I think with the rectangular bits in the middle it becomes more distracting.  I might retry one of them diagonally instead.

I'd expected to zip along this embroidery since the first week of projects was relatively quick, but now I know better.  I haven't managed to get started on any other projects in the class yet. I'm not even half done with this part yet!

Pilot FriXion
I want to say that I'm in love with my Pilot FriXion Ballpoint pen.   I drew on one of my jewels off center, and a touch of the iron and I had a blank slate to redraw it.   It doesn't rub off, it's a nice fine line, and I can easily change my mind about where I place something.  One thing people have found is  that if you put fabric in the freezer the pen mark comes back - maybe a concern if you live in Alaska or are a perfectionist.  I'm not sure I'd want to live without it now that I have one.


Happy Independence Day to all!  I'm dragging out the ice cream maker and lighting the BBQ!


Monday, June 11, 2012

Handstitched Class: Center Dogwood Blossom


Wait!!! That doesn't look square!!!


For the handstitched class quilt, I missed the part where you cut the dogwood blossom shape OUT of the freezer paper before ironing it to the fabric.  One thing about being unorganized was I didn't turn on my laptop in my sewing room, so was running back and forth to the computer room to read directions.   Anyway I ended up ironing the whole piece on and then cutting fabric/paper out with a 1/2" seam allowance to the line, which meant that after clipping to the border I had to trim that excess 1/2" of freezer paper off, being careful to not cut any of the fabric.


My "blind stitches" went further onto the dogwood medallion than needed, and I decided to use some fly stitching on the mitred corners, though I might upgrade to a whipped fly stitch (talk about exciting and daring!).  Obviously this means I'm changing the layout of the border hand stitching, and I may add some flowery element to to see if that supports the rich Moroccan feel I'm aiming for (though I already get the idea my quilt is a sentient thing that's going to turn out however it damn well pleases).  It's fun to be adding other embroidery elements to the hand stitching tools I'm learning.


I'm enamored of Sarah's Hand Embroidery Tutorials which has tutorials on a ton of stitches.


I had a heck of a time choosing the outer print for this, I wasn't really happy with any of my options.  I went with Valori Wells' Wrenly in Violet, as it has the green pink and orange that I'm going to be doing the hand stitching in.  I was amazed at what a different feel each fabric I tried as a background gave. I'm having trouble visualizing my end product without more closeups of the finished quilt - not sure where the prints actually go in it.
I didn't do mitred corners on the outer layer because it just didn't look right.
My square isn't exactly square, and I think it's 1/4" short in a couple of places, but will figure out what to do about that after the border is stitched.

Thursday, June 7, 2012

Handstitched Class: Eyelet Needlebook


I made an eyelet needlebook last night for my Stitched In Color Handstitched class and I will say I'm getting frustrated at my seeming inability to read and follow directions!  The felt piece is 1/2" inch longer on one side & got positioned sideways when I stitched the circles because I failed to double check the measurements.   I had already stitched on the button, cut out the circles and done the blanket stitch before I realized this.

My first choice fabric really just didn't work -  it would've looked "super hella awesome" inside but you couldn't see enough of the spots through the holes.  It also wasn't wide enough but I  still hadn't caught on to my problem.  Next I tried a second fabric which also couldn't get me enough different colors through the circles to work, and it was also too narrow. At that point I grabbed a thing called a ruler, and quickly figured out that I better revamp the size of my lining fabric.

Limited by my felt color, my not big enough stash, needing to see SOMETHING I liked through the circle cut outs & the fact I already had a silvery button & yellow blanket stitching, I ended up using Michael Miller, Petite Point Citron.  I don't have a lot to say about the fabric, I mean it matches!  My cheap back up scissors really don't however...does it say something bad about me that I want to go buy scissors that match?

The one thing I did that I'm pleased with was to add a bead to the closure thread.  I tried my hand at jewelry making several years back and had a bit too much fun at my first and only bead show, so I checked my boxes to see if I had anything that would work.  My eye immediately fell on a bead that was both silvery like my button and greenish like everything else.

I think I will make a round book of some sort for needles and a pocket for a few skeins of floss wound onto thread bobbins, and a teeny one just for needles.  I might see if I can manage to add one row of yellow floss onto the button on this one so it is more cohesive looking.   So far I'm having a lot of fun with this class!

1st choice, Alexander Henry Griffith Dot (fabricworm.com)


2nd choice, Salt Air Sea Garden by Cosmo Cricket

Wednesday, June 6, 2012

Handstitched Class - planning a palette

inspiration photo


I figured I should work on an actual color scheme for the Stitched in Color Modern Medallion quilt for Handstitched class.  I had an awesome sheet that just didn't wear well and I'd cut it up to make some pajama bottoms recently.  I still had lots of it left so decided to base the quilt around that.  It's sadly the closest thing in my house that has any exotic Moroccan feel to it so I was glad to find some things to re-purpose it for.   Also it's color reminds me of my favorite tea - Celestial Seasoning's Mandarin Orange Spice that I've been drinking since I was a kid. MMMMM.


I browsed through my folder of design magazine pages looking to see what color combinations I had which included orange.  I came across a photo that I've been holding onto for about ten years.  Anytime I see it I just want to curl up and take a nap (after kicking off whoever the hell belongs to those feet).  My stash has a good amount of oranges & purpley-red prints so it seemed like a good way to go without spending a lot of money to purchase additional fabric.


I went to Colourlovers and uploaded the photo and pulled a few colors off of it.  I drew the line at scanning a scrap of the sheet so I could get an exact match though.  I also have a lot of green in my stash so I added that to the palette as I think it works for what I'm looking for.  I think  still need a yellow and a magenta-ish solid.  Thank goodness I got my Kona color card!


I er...got so eager to start on the quilt that I have to admit that I already cut the strips out of one print for the center medallion border last week  Also I count that I have 21 fabrics ready willing and able to go instead of 10-14, which means I have some editing to do.


I think this quilt could look quite nice with these choices (mebbe).  Other people are starting to post their delicious fabric choices but I'm not going to let that make me second guess too much.  I'm already going to change it into a rectangular quilt instead of a square and that's enough controversy for me!


Stitched in Color - handstitched class

Saturday, May 26, 2012

Handstitched - Stitched In Color class


I'm super excited to take my first sewing class.  It might say something about my introverted personality that it's an online class (or it might just confirm I'm devoted to wearing pajamas and I can't do that in public),  but as what piqued my interest in quilting was a quilt on Rachel's Stitched in Color blog, it seems only fitting that I'd take her class to learn the intricacies of hand stitching.

I'm quite a procrastinator, so I was lucky I signed up the same day she announced it was open, as it sold out rather quickly.   I bought the student kit for it, and chose a lovely moss colored felt that reflects the soggy pacific northwest parks full of greenery and banana slugs.  It also had several different sewing related items such as transfer paper I haven't ever used.

I'm really looking forward to the class start on June 4th, and think I'm mostly prepared supply wise except some freezer paper - and I'm sure I'll need a bit more fabric, everybody always needs more fabric!

It should be fun seeing if I can keep on a schedule which is as follows:

Week 1:  Reverse Applique - no experience 
Week 3:  Embroidery - limited needlework as a pre-teen 
Week 5:  English Paper Piecing - no experience, looking forward to learning 
Week 7:  Applique - I've done one item with the machine and one by hand, both teeny. 
Week 9:  Hand quilting - a bit of decorative experience on a couple projects after reading about it @ Stitched in Color and a great tutorial on Anna Maria Horner's blog. No idea what it will be like to do actual practical quilting, but since I can't fit a larger quilt into my sewing machine this will be the most useful thing I learn I imagine.

I'm a bit conflicted and worried about the medallion quilt for the main project.  I like aspects of it but there are so many pieces and shapes I'm worried about making a cohesive color scheme arrangement  that works for me. Have some plans churning for it at least!