Friday, August 31, 2012

Coaster of the Month - August

I wasn't sure what to do this month, then earlier this week I saw a tutorial at Canoe Ridge Creations for their contribution to the Festival of Hexagons series of hex tutorials which just finished up.

I've been meaning to get around to paper piecing some of them, but this was the first actual hexagon I've cut and used.

This was nice fast project, it took me less than an hour and that included a few minutes with a seam ripper (don't ask...)


I stitched around the edge with white thread, then some Aurifil around the hexagon, then my common sense deserted me and I started making sewing triangl-y bits around the border...I don't know what was up with that, I thought I'd use more of the variegated thread for some amazing effect... if I were to do it again, I'd just sew around the center hexagon with a few rows of thread. 

The back?  I just grabbed a couple of pink scraps.  I don't think I plan on turning this over too often, but I do plan on making some more of this shape, it was a fun project.

One thing you might be wondering if  you don't have a hexagon template is "How the heck do I make a 1.75" hexagon?  The website Incompetech has a great free tool to be able to make your own hexagon or triangle templates for paper piecing, graph paper, and a few other fun things.  You just plug in the size you need and voila!

Wednesday, August 29, 2012

Mario Pillow - Mission Accomplished!


Angela at Cut to Pieces is in the process of doing a Mario Brothers quilt a long.  Now I played Pong on our Atari console as a kid, Kangaroo anyplace I could find it, and even Sonic the Hedgehog for like THREE hours as a  teenager to impress my boyfriend, but I certainly skipped right over the whole Mario thing.

I did manage to grow up to be somewhat of a video & board game lover (my husband works in the game industry so it's the least I can do?) but since I never played it, I don't usually really understand what all the excitement is about.


Pillow Back with extra 1.5" strips
My friend Scot really loves Mario.  Like "hoping for a Mario themed wedding cake" loves. I made the mistake of telling him about the quilt along even though he had already been haranguing me (if you read this Scot, don't try denying it) yes haranguing me to make him something Mario related.  I had no desire to  because well...Mario just isn't "pretty".  Then this quilt along showed up and the amount of work that is going into those blocks, well, you have to be really committed.  I've been doing so much hand stitching and quilting that my body isn't up to something of that magnitude right now.


 Scot is commuting 1100 miles today to go to a Seattle gaming convention (or visit me, I think its a toss up), and with my husband prefacing his visit by saying very unhelpful things like "Why don't you make Scot some Mario coasters ?" I decided I better make something before I was driven to violence.  Since Angela is awesomely posting PDF's of the blocks as they go in the flickr group for the QAL...


I decided to take the PDF of the Mario block, and break it down into longer strips instead of 1.5" squares  By just adding 1/4" seam allowance to the end of each color block, I was able to cut down the wear and tear on my body.   Luckily I finally got a 1/4" piecing foot which made this SO much easier (and straighter) when I put it together. I ended up with close to a 19" square, which could've been made a wee bit smaller to fit my 18" insert.  It's possible other people have done this for the QAL, I haven't had time to look through the whole group lately.


I thought I should use some embroidery too.  Scot likes to be told he's awesome (a Canadian thing?) so I put it in writing for him, I need to keep practicing that skill (embroidery, not flattering my friends).

He'd wanted to make himself a Piranha plant footstool after seeing a tutorial for it, so I figured he'd appreciate one on his pillow too, and I found an interesting take of it online .

Joann's Fabrics had all all the colors I needed in Kona cotton for this in stock (a miracle)!

I used fusible interfacing on the back of the embroidery to protect it, and since I had practiced zippers for my pouches earlier this year, I opted for a zipper closure.  It took a long full day to do the cutting and sewing, and a shorter day to do the embroidery.  I am not totally displeased with how it turned out (that counts as my version of a compliment to myself :).  I've put it in the "guest bedroom" (futon sofa residing in my husband's game room) on the bed for a surprise when he gets here in a few hours , and I now I feel I don't have to do anything else nice to prove I'm a good friend until his wedding next summer!

Monday, August 27, 2012

Zakka Style Sew Along - Pleated Coin Purse

what? you say its slightly lopsided?
This was one of the Zakka Style projects I was looking forward to the most.  I was worried because it involved a purse frame & a new lining technique.  I was SUPPOSED to do this technique for a couple of garments I've made, but I was nervous about it. I followed the excellent, straightforward instructions for this particular Zakka Style project and before I knew it I'd done it!

The outer fabric is Lotta Jansdotter's small spring buds in Espresso (sigh that makes me want coffee) and it's lined with Valori Wells Liv in Coral from the Cocoon collection.  I'm not sure the combination was the best choice, but I get to imagine giant butterflies landing on delicate flowers, so I'm happy.


My purse hardware is from Bagpurseframes on Etsy.com.  They have an amazing amount of purse hardware, their items ship from the source so they take a bit longer to make it to you, but it was kind of fun to get my first mail from China and it got here in plenty of time for this week's project!  Now that I've almost successfully accomplished my first purse with a frame, I'm looking forward to planning more in the future.


I think my only complaint about this is that it doesn't have a wide enough mouth for how deep it is to put your hand in and dig around the bottom and root around for stuff, if you are the sort to put "stuff" in a purse.

 I can't actually picture using it for change, it's 2x bigger than I'd want a coin purse to be I think - but filling it with a lip gloss, compact and eyeliner? Perfect.  If you didn't line it with batting and used interfacing it'd be much more flexible to bring the bottom up to you, so I may try that the next time.


ooh the light is glistening off the beads!
As shown, I have more of these frames with different colored beads. I'd love to alter the shape of this to make a glasses case for my husband, but I think he'd object to the giant beads, so I'll have to make one for my sunglasses instead.  At this rate my purse is going to be full of things I've made, which pretty cool now that I think of it.  Great challenge... I need to empty out my purse and make a container for every single thing in there. Then I need to make my own purse, shoes, and knit my own socks so I wander the streets in 100% handmade goods!

Saturday, August 25, 2012

Fabric.com 3 lb. Remnant Overview & Autumn Fabric Giveaway

The Quilting Gallery is hosting a blog hop party of giveaways to celebrate back to school times.  The full list of participating blogs will be up on Monday, so make sure to stop on by there and check it out.  It's good timing for me, since there's a better chance people who are interested in seasonal fabric will see this! Please feel free to look around.
 
Fabric.com 3 pound assortment
I wanted to go over my Three Pound Remnant bundle from Fabric.com. They're out of stock today but they'll be back.  Last month Fabric.com described them a bit more in detail on their FB wall, so I got intrigued enough to roll the dice.  I always search for reviews & pictures before I order a bundle so I have a better idea of what I might get, and would hate to forget to do my part.

Description: You will receive three pounds of cotton fabric, approximately nine yards of fabric. Assortments are packaged at random with end-of-the-bolt remnant fabrics. Individual fabric pieces can range in size from 1/8 yard up about one yard each.


This is good or bad depending on your outlook, I ended up with 9 different fabrics, about one yard each.  However since I either don't like most of them, or they aren't suited for my style, I'm a bit let down, I was hoping for smaller cuts and more variety.  I do think the bottom middle one will be fun to use (Velocity Tonal City in Navy - Jessica Hogarth for P&B fabric)


Friday, August 24, 2012

Heather Ross Nursery Versery - Live On Stage


My favorite spider of all
I'd been waiting for Heather Ross' Nursery Versery to be available at Intrepid thread, I really just wanted to make sure to get the Itsy Bitsy Spider print because it's so freakin adorable, but when Rachel at Stitched in Color decided to throw down the gauntlet and challenge us to do something with this line, I gave in and got a bundle from Fabricworm.com even though I had no ideas at all.

The only other Heather Ross fabric I've gotten my hands on is one of her guitar prints, which also arrived this Tuesday along with my Nursery Versery bundle. (Oh If only I'd gotten into sewing a year or two earlier!) and I decided to do something that incorporated it.  "It's Raining" is not my favorite Peter, Paul and Mary song by far, but it seemed apt for the print, especially as soon it's going to be rainy season here again. (Just to note, I'm torn between "500 Miles" and "Lemon Tree" ;)


So that's what this is, Peter Paul and Mary on stage giving an outdoor concert.  I resisted the tempation to embroider long blonde hair on the female pig though...

I was going to make a mug rug originally, but the size kept increasing,and it turned into a er...somewhat rectangular wall hanging (9" by 12"). I used embroidery (poorly!) hand and machine applique & hand stitching on this.  I also learned I really need to practice binding corners on smaller projects!


 I used Rowan Fabrics shot cotton for the grass (considered embroidering blades of grass onto it but nixed the idea) Essex linen for the stage, Art Gallery Pure Elements in Fresh Blue for the embroidery/sky.

I like aspects of it, but mostly I like that I did something outside of my comfort zone.  I dig tweaking other people's patterns and ideas, but I've never really improvised like this before and I'm not a creative type at all, so its nice to know that my brain is capable of making silly things.


Wednesday, August 22, 2012

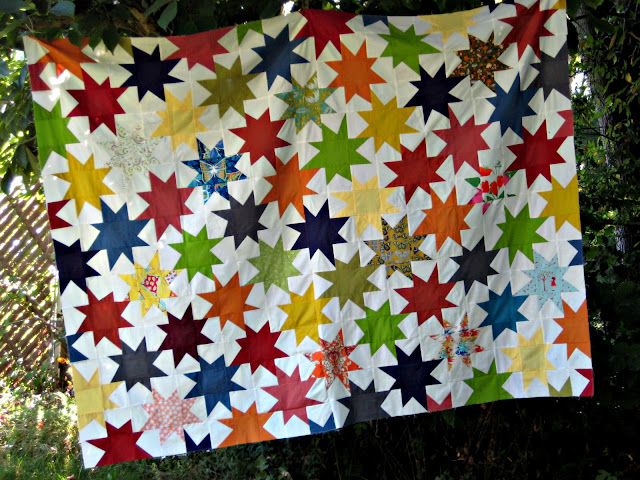
Wonky Star Engagement Quilt Top


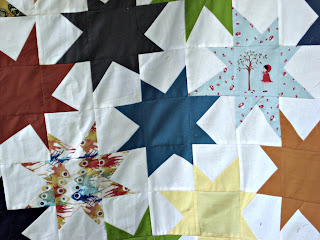
I finally finished my 4th large quilt top.  I wrote about the inspiration for this in June when I made my cat bed.  The stars use quite a bit of fabric, and involves tons of cutting & trimming, so I'm glad to be done with this part.  I added a border to it right after I took it down,  it was a bit smaller than I wanted it to be. The tutorial I used for for the wonky stars is on The Silly BooDilly blog.

I got this done the night before my husband went on a work trip, and while tempted to ask him to go hold it up for me at 6 am before his flight, resisted.  None of our trees are really set up for anything to hang evenly, so I jury rigged some zip ties and dangling twine off a magnolia tree, and managed to get it hanging "somewhat" evenly.

This is going to be an engagement gift for my lovely ex-husband and his fiance - he said he liked blues and greens, and she liked oranges and reds, so I attempted to work a lot of those hues into it.  Sadly I ordered the fabric before I got a Kona color card so I ended up not quite as thrilled by some of the colors in person.

After making a lot of the solid stars, they were reading as flat and dull to me, so I decided to mix some prints into it - are all my choices successful? Probably not, but he's given me some duds of gifts over the years, so I'm not too concerned ;) With the prints, and adding a few stars in Art Gallery's Pure Element's empire yellow, I feel it has a lot more life in it now.


It is now sandwiched, and I've decided to do a binding-less quilt.  That wasn't exactly my plan.  I ordered 118" Kona Premium Muslin for the back, measured carefully enough to cut strips off to border the front, then found myself 2 inches short since I neglected to take what would be the new larger size of the front into account.  I'd say I wont make that mistake again but...I'm sure I will. On the bright side the Kona muslin is actually pretty soft and snuggly, I will probably use it in the future too.


My plan is to do hand quilting around a lot of the stars, though I am thinking to do a series of machine quilted squares around it just to make sure it is well stabilized first. Luckily I think it will be a long enough engagement that by the time I finish, it hasn't become a wedding gift!

Sunday, August 19, 2012

Zakka Style Sew Along - Little Pocket Pillowcase


Having been under the weather all week, I had decided to pass on this Zakka Style Sew Along project until some time down the road.  Then Heidi at Fabric Mutt posted her version with a smaller pillow instead of a pillowcase, and I was all charmed by it.  I decided to I had to go ahead with something similar.

I'm often in danger of  not starting a project, or putting it down and never finishing it, if I don't get to it while its on my mind, and I was afraid that would happen to this.

We have friends expecting a boy in October, who have a 3 year old girl.   I plan on making a baby blanket for him, but since I've only been crafting/quilting since earlier this year, hadn't made anything for her.  I'm pretty sure it's a crime to give a present to one kid without giving one to the other, so I'd always had this project in mind for her.

I made the diamonds larger (and no they didn't line up).  I used a bit of Woodland Tails by Riley Blake & Monaluna's Fox Hollow on the front & Lesley Grainger's Pretty Paisley Flannel for the back and bear.  I plan on using the same fabrics for the baby quilt.


The dimensions ended up being 10" by 12"  I'm thinking of this as more of a "Traveling Bear Sleeping Bag".  When I took it outside for its photo shoot and carried it back inside under my arm, I decided I might want to make myself one, it travels nicely that way!