So this is my first completed quilted project that I wrapped up a few weeks ago. I have to say I never
thought I’d quilt. I’ve been sewing apparel (mostly badly) for a year, and sure I'd seen a pretty quilt or pillow here or there, but I never thought I'd be spending hours pouring over blogs excited to find out just how variable the quilting world is.
Somehow I wandered across the Stitched in Color blog and saw this quilt - Loulouthi Tiles.

Well I know HOW I got there. I kept trying to buy beautiful quilting fabrics to make clothes with. I made a really wrinkle prone, if cute, top. I made the most comfortable bathrobe ever with a Kaffe Fassett paperweight (I can be wrinkly as I want in private!) I let my Amy Butler and Anna Maria Horner purchases just sit in my boxes of fabric though, hoping against hope that one day I would wake up to find that quilting cottons had suddenly become practical to wear.
I kept Googling images of some of my favorite quilting fabrics anyway though, and that is how I arrived at finding pictures of that quilt, a PDF tutorial for it that Rachel was lovely enough to put together, and the realization that it was time to brighten up my bedroom. When I saw it I fell a little bit in love. I'd coveted some of the prints she'd used in it for awhile. I thought I would jump right in and make a queen sized quilt for the bedroom, but I
read advice (and LISTENED for once!) that you should start small so if you ended up deciding it wasn’t for you, you weren’t stuck with a giant
UFO project crammed in the back of your closet.
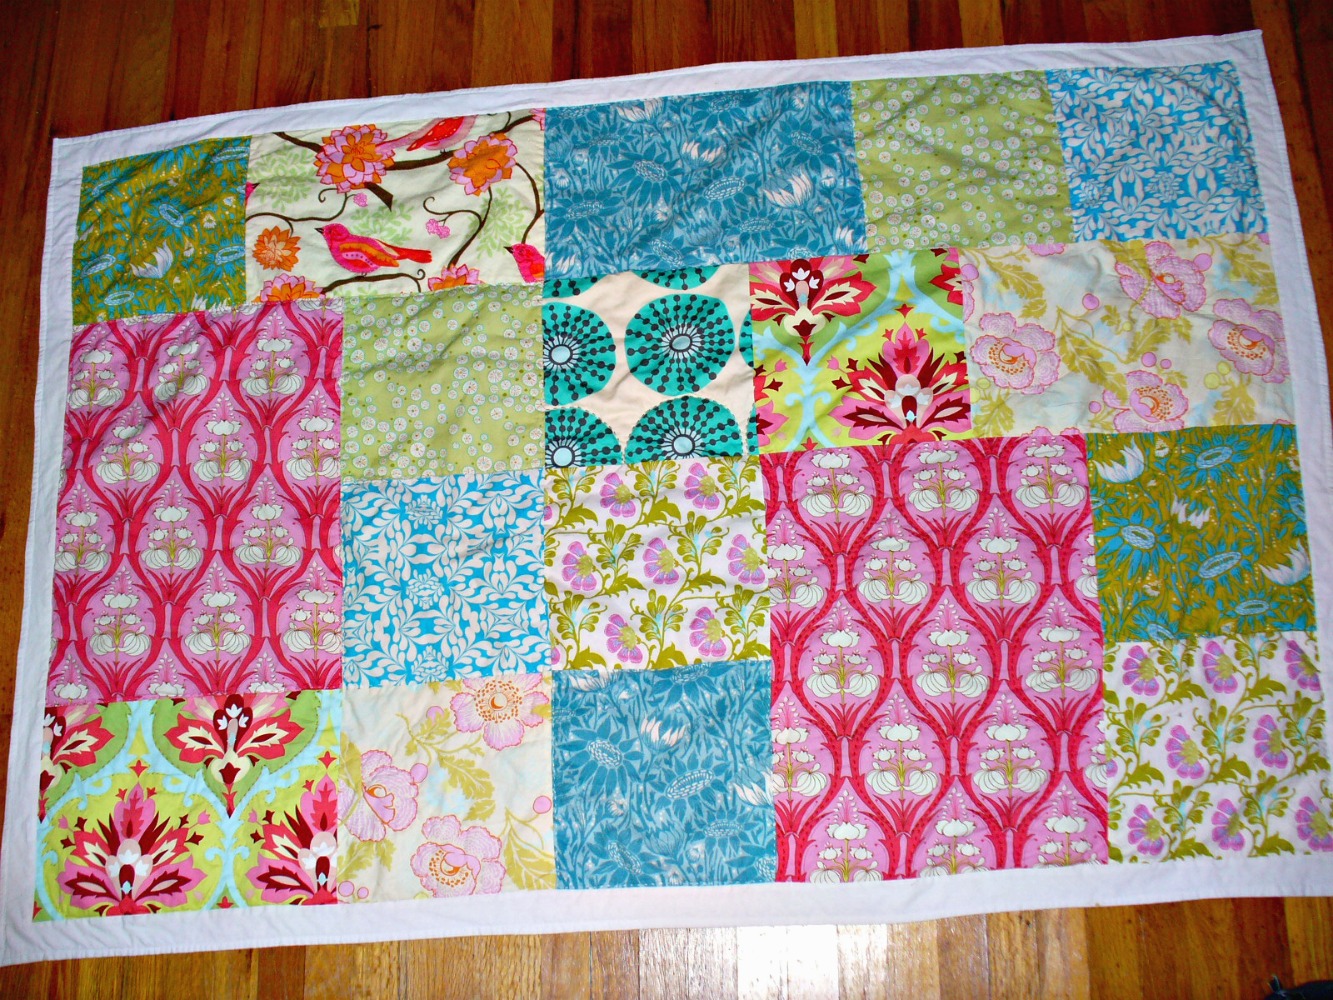
So I took the plunge, got enough fabric for my quilt and then some, and before I knew it I had a cozy little lap quilt. The finished dimensions are about 46" x 68" and it’s the perfect size to wrap
around me when my toes get cold and I’m at the computer (aka most days). I learned two things from this I am glad I figured out before tackling anything big.
1. PLAN your blocks out. I did plan well to piece individual squares/rectangles together into larger sections before I put all the sections together. This led me to having to try to sew part of it together in a zigzag. No excuse for that as I'd read pretty clearly that I needed to plan to do this, but what can I say, every time I put fabric down on the floor my cats decide it's time to pretend it's a slip and slide, so I got a bit frustrated and took shortcuts.
2. DON'T start until you have your mise en place ready! I started hand quilting around the tiles and some of the details BEFORE the lap frame
I’d ordered arrived. This resulted in
some lumpy areas, and I had to cut out a lot of what I'd done and start from scratch. Don't make this mistake!

I did a fair amount of detail stitching on this quilt. Partially because it's kind of pretty (not that you can tell, won't even subject the internet to my other blurry poorly contrasted photos) and partially because I can't fit too much quilt under the needle of my short armed sewing machine, and I didn't see any other way to firmly sandwich the layers together. I didn't have the budget to purchase amazing perle cotton, so I purchased embroidery floss and went to town.
I got advice on hand quilting mainly from tutorials on the Stitched in Color
blog, and Anna Maria Horner’s blog. I
have quite a ways to go with getting the stitching nice and even, but I had fun
playing with it. I think I’m going to
skip doing hand stitching for embellishment purposes on my queen quilt. My three cats have shedding on their top five list of hobbies which means lots of laundry. (Pretty sure that's clearly visible on the above picture). At least I'll wait until I figure how well this one handles being washed repeatedly.
No comments:
Post a Comment