Monday, December 31, 2012

Finally Finished Modern Medallion Quilt!!!


I thought this would be a great year ending post (a super long one too).  Earlier this month I finally finished the quilt for Handstitched class at Stitched in Color that ended in August.  Since then I'd been working on hand stitching the border in bits and pieces. I am thoroughly satisfied with being finished. AND I'm just in time as registration for Rachel's classes start January 1st, and I'm going to register for the Curves class.

Some of the techniques that went into this quilt and how I felt about them-
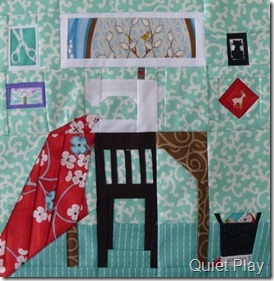
Reverse Applique: Simple enough, though I did NOT read the directions so I made three times as much work for myself as needed.  I will probably be using this technique in the future but haven't had a reason to do so yet..

Perhaps because THIS fabric is cotton sheeting instead of quilting cotton, it's the one area of the quilt that got ripply.


Satin & Jewels:  Phew was it time consuming!

I opted to add in a bit of embroidery from September House, and also a picture of some henna work I saw online.  My border was half an inch too small so I altered from the original design quite a bit, but looking back I wish I'd just narrowed everything a bit and stayed true to the original.

The colors and shape has held up pretty well after the first washing, this was also the motivation for me to start embroidering in general.


Applique: It was fun to try, but I find it unlikely that I'll be incorporating it into anything except wall art.

It doesn't seem sturdy enough to me for anything that is going to get much use, and with three cats well, you do a lot of laundry.


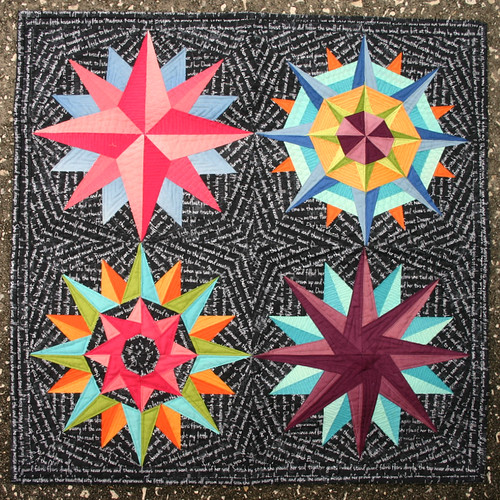
English Paper Piecing: This was fun, it's wonderful because once you learn it you realize you can make all sorts of designs on your own (or follow any of the thousands of ideas already out there.)

I've done several paper pieced projects since I did this part of the quilt. Also become addicted to paper piecing hexagons.

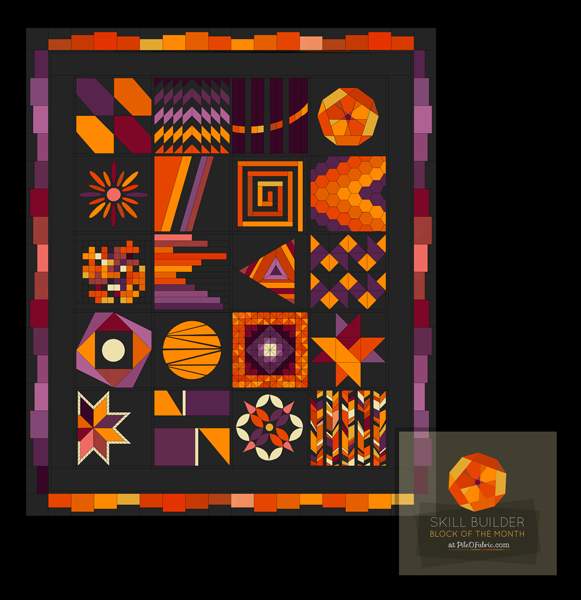
Also I'm now going to do the BOM paper piecing QAL over at Quiet Play that starts next month.


On Point Squares: Fun, and I had enough of a seam allowance on this part (wasn't the case with a few parts of this quilt, let me tell you!) to sew it together correctly. No clue if I'll use it again but I'm glad I wont be scared to try it in the future.


Hand quilting:  There are som good tips & tutorials on it from Anna Maria Horner and, surprise surprise, Rachel at Stitched in Color

I don't love doing it, it's hard on my neck and wrists and pretty timje consuming - but unless I get a more quilting friendly machine, I think I will be doing my share of it.

Have been using on a few other quilts so far and a lot of smaller projects.  I think the key is moderation.  I also did a gingko leaf pattern along two of the sides, I think I'd like it with all orange peel too, but I wanted to try something else.


I hand washed the quilt in the tub with Eucalan, and after that and a stint in the dryer it was cat hair free.

I mean I'm afraid to use it now as it was so much work and I'm pretty sure I failed to use a 1/4" seam allowance everywhere so it will come apart if I look at it sideways, but I do plan on taking it out and looking at it now and again ;)
 
The back was a lot of the leftover fabrics from the quilt,  I'm not sure piecing backs like this is really my style but it was nice to try it out. The middle certainly puckered up differently than the rest of the more heavily quilted areas after washing.


So I love love love it, flaws and all.  By far the most satisfying thing I have made to date.


Friday, December 28, 2012

Gonna be a busy 2013 isn't it?

I planned on starting the year sloooooowly.

Back in August I'd already planned on signing up for taking Rachel's Curves class on January 1st...of course, it's fun, she's a great teacher, it's only 5 weeks in duration, and you can work at your own pace.

And Sew On... BoM
Mid December I saw the adorable  "And Sew On.. " paper piecing sewing block related BoM Kristy is hosting at Quiet Play which is only nine blocks for the year, perfectly doable.  Starts simple and works it's way up to some complicated blocks!  I have only done simple designed paper piecing so I am really looking forward to the escalating challenges.

 The same week I saw Melissa at Bittersweet Designs is doing A Lovely Year of Finishes to motivate us to finish up UFO's and WIP's, one a month for the year, and who doesn't want to do that? (If you play along in hardcore version, it involves 2 blog posts a month with an in progress and a finished project report.)

I wavered a bit, because of the whole being accountable thing, but I do have a few things I want to finish up, and the project can be one you start and finish in the same month.


A Light in the Dark mini @dontcallmebetsy.com
 On Christmas day, I discovered my mother was going to do a BoM too, the one Elizabeth at dontcallmebesty is putting on, Lucky Stars, a foundation paper pieced BoM.  Besides the fact that the blocks are beautiful, foundation paper piecing is on my "must learn in 2013" list.

I was already in love with a few of her quilts, including <<< this disgustingly awesome paper pieced star one, so it seemed unreasonable to not give in and join the fun.

Admittedly now I'm finding myself almost overwhelmed and wondering when I'll have time to do other projects at all! 


Skill Builder Quilt at Pile O' Fabric
Edit...really?  And the day after I sign up for the Lucky Stars BoM Alyssa at PileoFabric goes and announces shes doing a Skill Builder Block of the Month QAL... Using the quilt as you go method no less, which I'm pretty sure was the last thing on my "must learn in 2013" sewing list not covered by any of the events above.


My husband has been making noises about me getting a more quilt appropriate sewing machine instead of trying to FMQ on my Brother Project Runway machine with a 5 inch harp space, especially when I gave him the rundown on how full my quilting plate is going to be, so I am looking forward to looking around to see what is out there :)  Otherwise I will probably be insane by March at this rate!

Wednesday, December 26, 2012

Christmas just might not be so bad after all.


I am going to admit something - I opened a present early.  My husband and I were wrapping each others presents his parents sent us so we'd have that whole unwrapping presents experience.  UPS dropped a box off and I brought it inside - from the return label I knew just what it was, so I put it back outside so when he got home he'd see it and smuggle it upstairs so he could wrap it, but instead it went something like this.

Him "Honey there's a box here!"
Me "Mmmhmmm"
Him "Will you come see what it is?"
Me "Its a box"
Him "Well duh, can you come see what it is?"
Me "Sigh, it's a present for me and you were supposed to take it upstairs and wrap it"
Him "Well I can go wrap it"
Me "Screw it, I'm opening it up and using it since I know what it is and I wanted to get to work on some hand quilting"

His parents got me a QSnap Floor Frame, and boy it would've been useful for most of the quilts I've made this year, I didn't realize how handy it would be.   So, I cheated on Christmas (sorry Mom!) but I got a lot of progress made on one of my quilts!  Uh, and apparently immediately and unwittingly provided the cats with another cat bed.


After Christmas I got to do some fabric folding, I had four bundles from The Intrepid Thread, I'd bought Notting Hill in the magenta colorway and a few other prints, then won Notting Hill in teal from FiberofAllSorts (yay!) and my SIL got me Frippery in warms and Floressence in Lumine Scent.  Seriously I just want to leave the fabrics there to look at for the next month but I have ironing to do!

So even though I don't like Christmas as a commercial holiday since that's not the point of it - I can't argue with having awesome things for sewing.  I am ashamed that all those stacks of FQ's are not keeping me from being aware there are a lot more fabrics that have come out recently that I want too.  Patience grasshopper...


Friday, December 21, 2012

Finished embroideries, yay!

I have a confession to make.  I can't wait until Christmas is over.  The tree is taking up precious sewing space!  I guess that's what happens when you turn the living room into a sewing room.  I've also already made Christmas dinner earlier this week so I don't spend Christmas day in the kitchen and can opt for something simpler to make.  This means today was a day of delicious grilled turkey and smoked gouda sandwiches. 

I finished two embroideries I was making for gifts, First was Heart o' Flowers.  After I put a backing on it I realized I hadn't finished the outer part of the leaves all the way, and so ripped out the stitches rather than dissemble it. I wanted to embroider EVERYthing in it, but apparently there's a fine art to not actually covering things 100% with floss, and I am trying to figure out how to accomplish that.


Also I made an impromptu toasty one when a friend who I haven't seen in months popped back into my life - they are very fond of toast and I thought something fun was in order.  The pattern is from a digital stamp by someoddgirl.

I decided to try some shading with oil pastels after seeing the idea at Wild Olive.  I didn't tint it until afterward the fact since I wasn't sure about it, and it turned out OK but next time I'll tint ahead of time.  It has some imperfections but I was still kind of sad to give it away!  I also tried combining fabric and embroidery.using a bit of Anna Maria Horner flannel stitched on for a countertop - too stretchy for it I think, so next time it will be regular old cotton.


I'm working on a bunch of new projects again, my sister rummaged through my stash for some fabrics for a chevron pillow top I'll be sewing together for her (she seemed drawn to Art Gallery fabrics, I love so many of their prints that I was happy to see she felt the same).  It was fun to watch somebody else work through their placement process.

Hopefully this next holiday week I will finish a pillow cover of my own I've been working on, and the all solids quilt top I started spontaneously last night.  I'm using some bright Kaffe Fassett shot cottons and Kona in Coal, and it's looking good so far.  I must say, I am really happy I decided to get interested in quilting earlier this year!

Monday, December 10, 2012

Star Blossom Paper Piecing


Hallway's too narrow to get a straight on shot of course


This Star Blossom block is a project from the Handstitched Class that Rachel @ Stitched in Color teaches.  (Shes opening registration for her classes again January 1st, I highly recommend you try her Handstitched class if you have any interest, I'll be taking her Curves one if I can)

This is paper pieced, sewn onto fabric and mounted on a 16"x20" canvas ( to do with as your imagination dictates).  I certainly did a better job on it than I did my first two attempts at paper piecing!


This is the second item I've sewn onto fabric & mounted on a canvas, and this one doesn't lay perfectly flush against the background fabric, but I am still pretty happy with it and I'll like it more when I get around to painting my walls beige ;)  Not sure about my fabric choices, I still have a lot to learn about that subject.

The piece in the middle was supposed to be more off center to show the other elements on it a bit more, but instead it just looks like I was trying to center the flower and sucked at it :)


unmounted and finished
Speaking of fabric, , I realized my carpentry skills aren't good enough to tackle my own cubby storage right now like I planned, so I got two ClosetMaid storage units from Lowe's.

 My stash was getting a bit unwieldy as I was keeping it in a stack of plastic bins, which of course always had at least one cat sleeping on the top lid so I couldn't get to it.  These aren't the best storage solution (had to turn them on their sides for the fabric to fit in this way) but they'll work for the time being and were not that expensive all things considered ($45 each).


One unit is being used for prewashed  fabric (I stopped prewashing 6 months ago) and I'm thinking I better really delve into the prewashed to make some room since I couldn't fit all my non washed fabric in... I'm hoping that having it all visible will uh...keep me from buying more?

Friday, December 7, 2012

Custom Open Wide Pouch for Bath Bombs

variant of open wide zipper pouch

I like the concept of Noodlehead's open wide zipper pouch so much that I thought I'd adapt it to fit a  specific item.  I'm still tinkering looking for the perfect bath bomb recipe, so I thought I'd try a new variant for a Christmas gift but I needed some packaging - and a custom bag seemed like a great solution.


A recipe make 6 two inch squares in a silicone ice cube tray, but since I want to test at least one from every batch I make to give away, I needed to fit 5 of them in.  After measuring the dimensions of the row of bath bombs I cut two pieces of 10" by 16" fabric and one piece of batting the same size.

 I followed the tutorial for the pouch to attach the zipper on one side, but since this was one piece of fabric instead of two I used a zipper several inches longer than the pouch and unzipped it most of the way so I could easily flip it in the other direction to sew the zipper onto the other side.


I hand stitched next to the zipper with cotton pearl thread to reinforce it, and made the box corners the right width for the bath bombs to be able to sit flat on the bottom of it. I just wrapped them in parchment paper (I had no idea tape wouldn't stick to parchment!) and they fit inside just about perfectly. The pouch is rather triangular viewed from the end.

This fabric is some that I picked up at Joann's before I started quilting or craft sewing - I have no idea why I bought this, it doesn't seem my style but I think it's a decent choice to house a bath item.  The shape of this is this.  The shape of the pouch is odd so I'm not sure what it will be used for afterwards.  I love how it opens all the way.


Continue reading for the bath bomb recipe (which I'm mainly writing about to keep notes on my progress towards finding the right mix)

Tuesday, December 4, 2012

Paper Pieced Insulated Trivet & Visit to Urban Craft Uprising


Well that's a mouthful!


Star cut out from an 8" circle of cardstock
I'm doing a bit more paper piecing here and there I love that you can make anything you can dream of, but I cant draw so drawing pictures then deconstructing them isn't a walk in the park and I have to keep it simple.  Luckily there's wiser people out there than me for when I want to upgrade to complicated projects! Until then I'll just cut things out of cardstock with trial and error ;)

I used La Dee Da Floradots in Saffron from Free Spirit Fabrics for the star.  My plan was to have a well graduated circle of light to dark blue around it, but I didn't stop to make sure I had that before cutting things out (I do NOT do so well with the planning stages of fabric choice...) so it got a bit wonky and I didn't really get a good mix between small and large prints either, but I'm still happy with how it turned out.  Art gallery's Pure Elements in empire yellow made a good match for the binding,  which was sewn on with pearl cotton thread.


Since I figured I may as well make this Christmassy I used one holiday tree fabric on the front, and for the back one of the Christmas fabrics my mother in law gifted me.  It's sandwiched as following:
Backing fabric
Layer of cotton batting
Layer of insulated batting
Paper pieced star
I'm impressed with how well the insulated batting works, and a yard of it is taking me a long way, I've made two potholders, 4 trivets, and still have enough for a couple more things.


Urban Craft Uprising December 2012


I made it to Seattle's Urban Craft Uprising for the first time last weekend with my sister.  It was a great show, but I was a little dissapointed that while there were vendors of all sorts, there weren't that many people selling handmade goods of the crafty variety.  Jewelry, art, food products, ceramics, carnivorous terrariums, amazing clothing, but the only handmade vendor that didn't seem to be geared towards felty animal crafts was geared towards baby stuff.  I think i was hoping to get a lot of inspiration at the show, but mostly I just emptied my wallet!

I came away with $40 in salt :| $12 boxes of macaroons (that got crushed in my purse :( ), a bit of art including some fun from LaRu and some stocking stuffers for my husband.  Now that everybody can use their smart phones to take debit cards, the world has become a much more dangerous place for my budget!

Saturday, December 1, 2012

Cloth Lined Burlap Napkin Basket


I'd been wanting to make a basket to hold my cloth napkins in for a few months, and unable to bear the thought of working on any of my half finished projects, decided it'd be the perfect time to start a new one.  I had some burlap I grabbed on impulse from the remnant bin at Joann's as well as some Pelleon SF101 interfacing left over from the Weekender travel bag sea along so I figured that would be a good start.

Now...I haven't worked with burlap before, but this stuff was warpy and evasive!  I started off making a rectangular basket and ended up with a square one.  More or less the burlap was cut in a + shape with the middle of it 8 by 8 inches for the bottom and the branches being 8" by 5". 


Interfacing - one 8 by 8 inch piece for the bottom and four 5 by 8 inch pieces, basted onto the burlap +.  I was able to sew the corners together on my sewing machine instead of by hand (yay), then I hand sewed the handles on which were burlap wrapped and sewn around small pieces of the Pelleon.


I made the shell for the lining in a + shape also - 8.5" by 8.5" for the middle section (which is the bottom of the basket) with the four branches being 8.5" by 6.5"  I ended up with a bit of slack in the bottom, but the corners all fit in pretty nicely with a 1/4" seam allowance, and it enabled enough fabric to be folded over the edges of the burlap/interfacing so it about 1" isvisible on the outside. I stitched the lining in with a neutral pearl cotton.  One great thing about this is that if & when I want to switch out the lining all I need to do is remove the pearl thread.

The fabric for the lining is Salt Air Sea Garden by Cosmo Cricket in Summer


So I'm pretty sure I wont be working with burlap again unless I get my hands on a coffee bag.

There are certainly a dozen excuses for me to make more baskets of all shapes and sizes. This project can surely be done better, so I better practice!  And if I do switch out the lining I will probably move the handle down another inch for aesthetics.

Now I just need to make my own coordinating cloth napkins and I'll be set. Muahahaha! I didn't know how much fun a good hobby could be!