Tuesday, July 31, 2012

Sprightly Fabrics Order and Review

Sprightly Fabrics Order
I was lucky enough to win a prize via Sprightly Fabrics' Facebook page, and took that as a sign from fate I needed to order some extra fabric from them on Etsy too!  I'm trying to add more green to my stash.

I opted for the Tina Given's Haven Edge FQ bundle of Pagoda Lullaby in celery, and a yard each of Poetica in Serenade Moonlight by Patricia Bravo for Art Gallery,  Dainty Blossoms dots in green by Carina Gardner for Riley Blake, & Grand Hotel Mezzanine in sand by Jenean Morrison.


Now what I won was a FQ bundle of Tula Pink's Nightshade, and I was accidentally sent the other prize they had a giveaway for, a giant bundle of scraps (if you can call them scraps at all, it's 4-5 yards of fabric all told).  I love Tula Pink but I wasn't sure what to make with Nightshade except for "something for my sister" (would've had tons of ideas for it when I was younger).  I spoke with Monique at Sprightly Fabrics and since I was happy with the scraps, she said to go ahead and opt for keeping them.
lovely scrap bundle, inclusive of some Apple of my Eye for Riley Blake which I have some of already

Now the shop has all the Tula Pink - The Birds & The Bees in, hate to think what my order would've looked like if they'd already had that in stock when I ordered ;)  I had the highly stuffed envelope in my hand several days later, and the fabrics all arrived nice and crisp and unwrinkled so I'm a happy camper with my order too.

I was waiting to post until I finished my Modern Medallion Quilt, but although the front is all put together (and I did use some of the Poetica in Serenade Moonlight that came with this order) I still have 4 or so hours of embroidery to do before we start the hand stitching of the sandwich, hopefully I can finish that in the next few days!

Wednesday, July 25, 2012

Zakka Style Sew Along - Delightful Linen Bag(s)

complete with lint!


Joann's linen on the left, Essex linen on the right
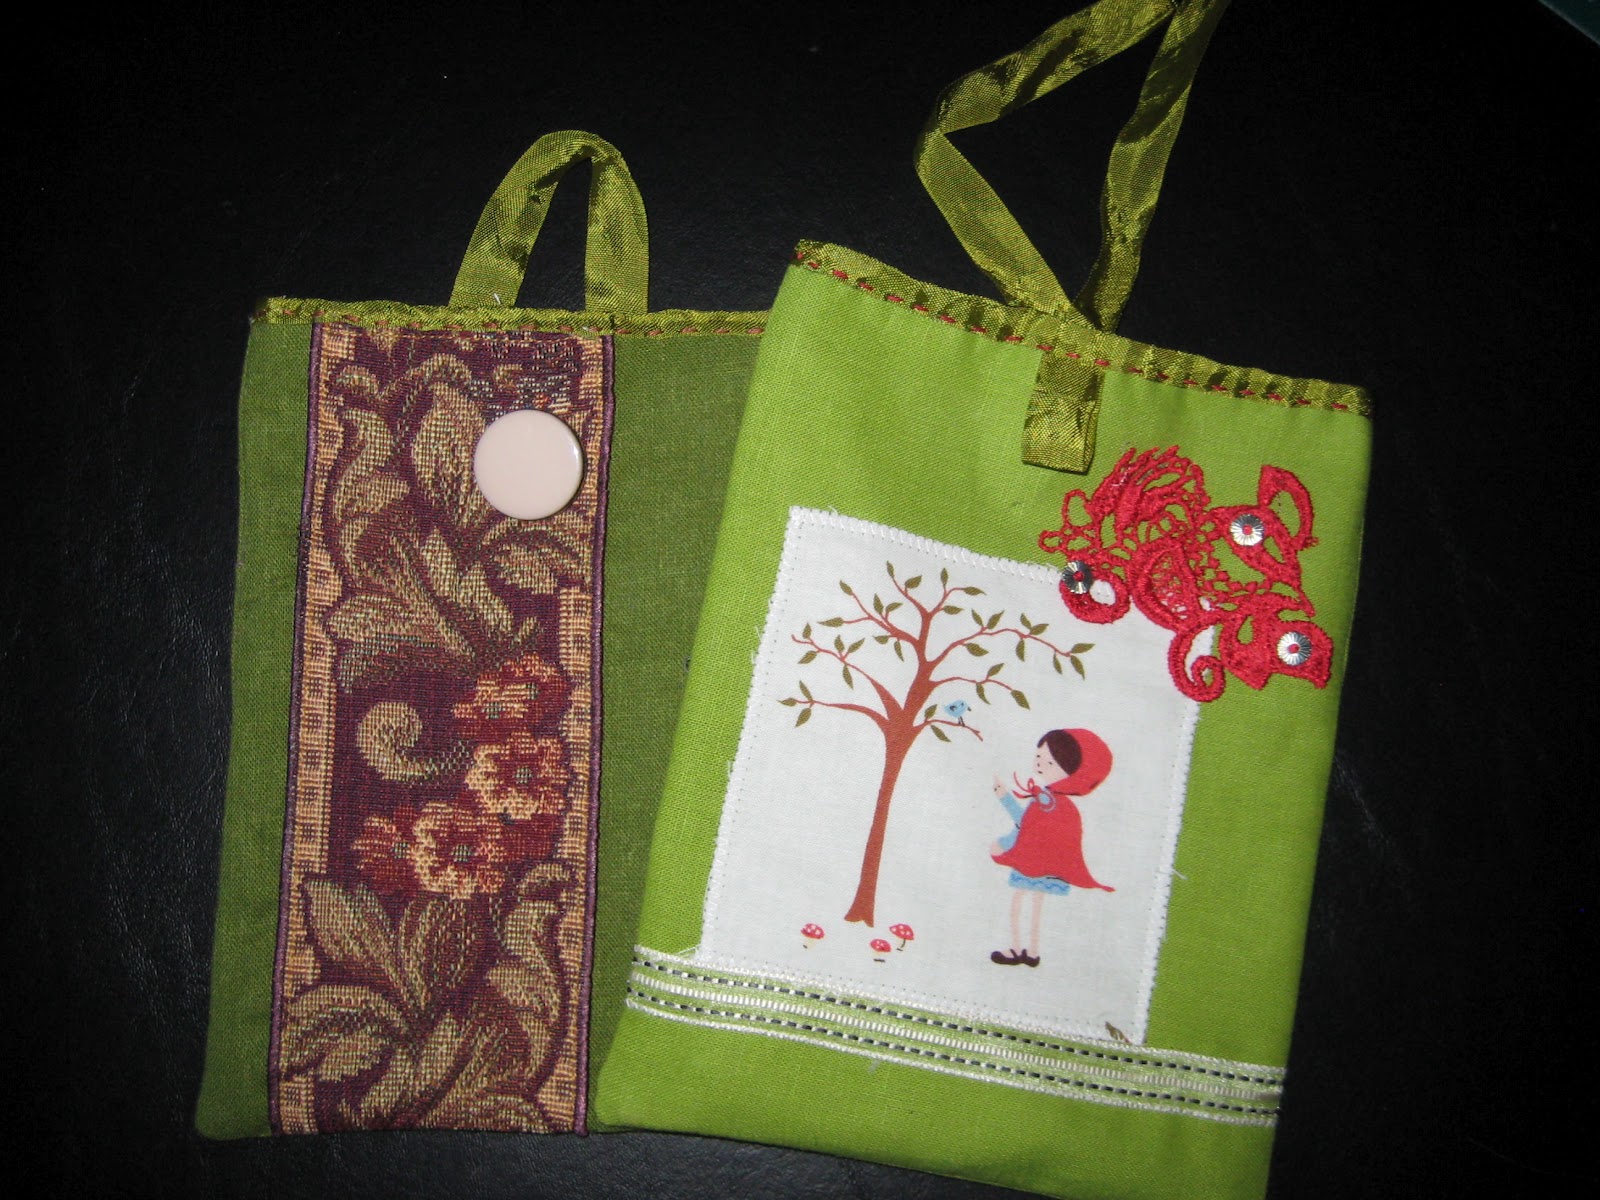
I thought this week's Zakka Style project was going to be perfect for packaging gifts for the holidays.  I  decided to try one with some linen from Joann's that I picked up purely for the Zakka Style Sew along, and one out of some Essex Linen which I just got last week from Sew Mama Sew! (with a gift card I won from a previous week's Zakka style project!) and hadn't worked with before.  The difference is pretty obvious.  The Joann's frayed a lot more, and doesn't feel or look anywhere as nice as the Essex.


I used Hug Snug seam binding to bind the top, and embroidery floss to secure it with a running stitch (after basting it).  On the Joann's I also put another layer of Hug Snug around the inside with fusible web tape, which I think makes the inside look a bit prettier than it did.  I also used Hug Snug for just about everything else (the rolls do come with 100 yards after all!).  For the Joann's I did a loop for the button, but for the Essex I decided to make it so I could close it with a bow instead.


Essex pouch, back ribbons passed through the front loop and tied, so..reflective of the flash!!!


extra layer of Hug Snug fused sorta evenly on the Joann's bag

I planned on making a inspirational bit of cross stitch for the Essex pouch but well...I have so many other things I'm working on I didn't!  (And I'm like...what do I make...something that says THRIVE! ?  GROW! ?...really I couldn't figure out what was both gift givey and also works with Aneela Hoey's little red riding hood.

There's a good chance I'll take that red lacy bit off of it  though, I'm pretty sure it's purpose was to decorate lingerie :o  I'm finding I'm seriously short on buttons, ribbons, and other decorative bits, but that's OK since embellishing things isn't my forte.  My trimmings came from Fabric Mart,  the Joann's trim and red lacy bits from a random trim bundle and the Essex's Mokuba ribbon purchased on purpose.  (Does that explain any embarassment I have about my odd decorating?)

Overall I loved this project from the Zakka Style book. Direction wise, it was a bit confusing, as it said you had to have scraps of lining and linen that were at least 8 x 13", then further down asked for two 6.5 x 7.5" pieces... that meant I cut the 8 x 13 and then would've wasted the 1/2" excess.  Instead I cut it to 6.5 x 8" but I still didn't understand the purpose of different dimensions.

This is nice because you can cut it for any size from a softcover book or Ipad or magazine (with subscription already ordered, yes!), and I love how if you are _thoughtful_ with your decorating, you can make some lovely gift bags with this concept!

Monday, July 23, 2012

Travelling Felt Pouch for my Embroidery Hoop

After making a needlebook for Handstitched class, I decided I'd try drafting a pouch that could carry an embroidery hoop, scissors, and a smaller sized needlebook inside of it.

This isn't exactly a tutorial, that would be too much organizational effort for my brain to document what I did (and I'm sure lots of people have done the same thing only better) I decided to make a pouch to fit my 4" hoop.


Tracing the pouch shape
I outlined two pieces of wool felt for the hoop pouch, tracing around the bottom half , then straight up to make a U shape for the top, adding a 1/2" seam allowance around the sides.  For the back piece, I added a flap so I could fold it over and button it closed.

Really I don't know that a pouch like this would need a closure at all, unless you use your purse as a weapon and violently swing it around hitting people on a regular basis.  This is pretty snug, and as the felt isn't exactly slippery, I find it very unlikely my hoop would slide out and get tangled in other stuff.


Traced inside hoop for needlebook
 You can sew a small piece of elastic to one of the pouch pieces before assembly if you like, to slide in and secure a pair of small scissors before you put your hoop in.  I didn't do this as I feel it's secure enough to tuck them inside the hoop, but if I make a different sized one I will probably try this.

For the  needlebook, I traced two pieces of felt using the inside of the hoop as a template.  Don't make the mistake I did and put the chalked side facing out! Luckily I only did it on one side, and the chalk is wearing off slowly.


So at this point it gets foggy, I used a blanket stitch to sew the pouch together, as well as to secure the linings for the pouch and the needlebook.  For the lining I used Valori Wells Wrenly Rosette in Violet.

I did a reverse applique wonky star for the pouch, as I'm on a wonky star kick, and a circle for the needlebook.

I'm pretty sure there were lots of better ways to assemble the needlebook, but it was getting late and I was getting tired, which means I was getting careless!


The needlebook can hold quite a few thread bobbins for floss and still fit easily into the hoop for storage.

I don't remember getting it,  but somewhere along the way I managed to become the owner of a single sad kitty button.  Luckily it matched the felt color well enough. 

Well back to working on my current quilt I guess!


Put the needlebook in the hoop then wrap the embroidery around it


Slide the entire package into the pouch and voila!


Saturday, July 21, 2012

Spiced Peach "Jam"

My mom canned quite a bit during a couple of summers when I was young.  We had a pear tree and there were rows and rows of white red and green tinted quart jars full of vanilla, mint and cinnamon pears along the shelves.  Sensible or not to be eating home canned goods so far down the road - as the the seals held we had the last jars almost 15 years after they were canned, and they were as good as ever.

I've been meaning to try my hand at canning since I was a teenager (which is currently like a really really long time ago).  I keep hoping to grow enough produce of my own to can, but our yard is very shady and the weather's been bad the last couple of years - even with new raised beds not much wants to grow - not even zucchini!   Since I could be waiting forever for a "need" to can, I decided to get around to it the way I do most things - which is to get the "props" first.  A canning book for Christmas, then jars a few weeks ago. (side note, that list should've included jar lifting tongs, I don't recommend canning without them unless you like splashing yourself with boiling water!!)


Add caption
Last week we were at Trader Joe's and my husband pointed to a 3 lb box of peaches and suggested I get them so I could actually, you know, make some jam.  It wasn't until the next day that I remembered I don't like peach jam - well I've never had it, so I assumed I don't like it.   I love canned peaches but I dislike fresh ones, I'm a devoted nectarine girl.

Since I found myself in possession of a box of peaches anyway, I went ahead and did it.  I made the Sure Jell recipe (mostly).  It called for 5.5 cups of sugar to 4 cups of fruit (!!!) but I added another 1.5 cups of chopped peaches.  1 tsp ginger, 1/2 tsp cloves, 1/2 tsp cinnamon, an extra tablespoon of lemon juice, and a bit of rum extract.


Ziki wasted no time claiming the empty box
Apparently in lots of fruit jam, especially peach, the fruit floats up to the top, and it can take up to a week to set.  I'd been flipping it over now and again to help disperse it.  However I can quit that since my jam did NOT set up.  From reading around it looks like you should cook the fruit for awhile to let it's natural pectins release before adding additional pectin, but since the directions just said bring to a boil then add pectin, that's what I did.  Nevertheless I've ended up with 4 pint jars of a nice thick spiced peach sauce which will be great on ice cream and French toast.


I'm almost caught up with the Handstitched Class quilt (well...to the last lessons stuff at least!) but I needed a break from intensive stitching so I thought I'd do a nice quick fun embroidery project so I could regroup.

 Mollie from Wild Olive was nice enough to make a download of cute stuff available on the day of her blog's 8 year anniversary which I managed to grab (and her stuff is just so cute!!) so I cobbled together two of the images to make some commemorative jam art.   Maybe I should make a second one that says syrup. ;(

Thursday, July 19, 2012

Patchwork Ribbon, Pincushions & Gaming Conventions

First off, I think Zakka Style's patchwork ribbon is a fun idea.  This example of it isn't so much (I don't have a ton of scraps yet) but I'll definitely be getting some Christmas fabric of some sort to make holiday ribbon, and probably save romanticky pinks reds and white scraps to make ribbon for Valentine's & birthday gifts for my husband.

There's not much else to say about this, I opted to use 2" strips, I had enough scraps to make 9 totally mismatching feet of it.


I've found that I need a dozen pincushions.  Or I should say there's not a single place in my house I haven't found myself needing one.  Since I've found myself walking around for hours with a few pins secured through a sleeve until I remember to put them where they belong, I figured it's safer to just make more pincushions!  I just embroidered a scrap of fabric with a design from Doodle Stitching - The Motif Collection and stuffed it with Poly-Fil.


Oh gaming conventions - my husband works for a game company and was gone most of last week to San Diego Comic-Con.  I've gone a couple of times but wasn't up for the crowds and entertaining myself while he worked this year.
The alone time was great for me because I had lots of sewing time!  I look forward to when he gets home but it's always a mixed bag because he comes armed with "gifts".  This time he got me a Deviled Hanimal and a drawing of a cat sitting in a litter box.  Among the things he got for himself are a Cthulhu snowglobe which will be heading directly to his man-room, and a print of all the Dr Who doctors as cats.   Oh men!


Monday, July 16, 2012

Coaster of the Month - July

I was working on an applique mug rug for this month's coaster, but then while looking for chair cushion patterns I saw a zig zag and had to drop everything to go make a zig zag mug rug. 

I'm pretty sure I need to take my machine in for a tune up - my bobbins aren't winding well & I'm having a devil of a time keeping my tension even (though really that's been an issue for some fabrics since I bought it). 


I need to work on spacing, but it's a lot better than last month's coaster, so I can't not be happy!  I still need a LOT of work on binding corners, but at least 2 of them are squarish?  I know there are better ways to deal with the end of the binding too, good thing I have the internet to look things up.

I used bits of fabric from Lucy's Crab Shack, Pezzy Prints & Serenade charm packs with some Kona Solids and Rowan shot cotton in Tangerine.


The next project I'm noodling on between other things is a quilt based around Piccadilly Circle's "Main Floral in Pink"that I got from Intrepid Thread.

I ordered some Kona solids to coordinate with it, and now I'm looking for the perfect pattern.  Pretty sure I should do it the other way around next time, but it just yelled SUMMER to me so I figured...hmm, no I didn't think beyond the yelling, fabric yells and I obey :(  Usually I have so much common sense too!

Friday, July 13, 2012

Handstiched Class - Paper Piecing Progress

PHEW So this is an intensive part of the Stitched In Color Handstitched class. I am still working on the embroidery from the last class, and working hard on the paper piecing from the current one.  I didn't expect my fingers to be as full of holes! I'm starting to think this is more dangerous than working in a kitchen ever was ;) This quilt is going to be hundreds of hours of work by the time I'm done, but the good thing is that people can choose to leave out some of the details and things that make it so time consuming if they chose.


All basted and ready to join the party
I was nervous about trying paper piecing, it took a bit to get the hang of it, and I kinda failed to watch the video tutorials all the way through, which might explain that.  Turns out it's kind of fun, and even soothing, however it's pretty tiring on my fingers

I stayed up until 3 am Wednesday night basting all the pieces I hadn't done yet.  Now I'm doing shorter stretches, and I want to take a short break to work on another project, rest my brain and my teeny little finger muscles.


Clipped so I can whipstich them together
After seeing hair clips being used to hold binding onto things, I thought I should try them out for this paper piecing, as holding the pieces together can be a bit difficult and slippery.  My triceps are sore from all the sewing and holding too!  Once I started using the clips I've been finding it easier and quicker to sew.

As you can see at the top, I finished one of my Storm At Sea Blocks - I needed some incentive to get rolling on the rest of it.  If I'd been using a clip then, maybe my hexagon wouldn't be askew!


My husband is out of town until Monday, so I am hoping to catch up on all my class work.  I'm also keeping busy in the kitchen, ordinarily I'd be hoping to make more use of fish and veggies, but instead I managed to put together homemade potstickers. He'll be really envious he's not here, but I'll freeze some for him, cause I'm sweet like that!